
Retevis RT29 is high power waterproof long range radio, when you have multiple quantity at hand, do you know how to quick programme multiple RT29?
Retevis RT29 is hot selling model currently, because of advantages below:

- 10W Higher power so long range
- 3200Mah big battery capacity, so long standby time
- IP67 waterproof, so also suitable for outdoor use
- UHF and VHF selection, choose for different scenarios conveniently
Many customers own RT29 because it’s so good performance a radio, they normally order not a few piece together. Some of them may meet a problem, how to quick programme multiple Retevis RT29?
Such as if you have 50pcs radios, after programming the first RT29, if you programme and edit the frequency and othe parameters into the other 49pcs one by one, it will take very long time.
Actually for programme mulitple RT29, there’s a quick way. Today we will introduce this small tip.
How to programme the first RT29?
1.Please download Universal USB driver and RT29 programming software from Retevis official website freely.https://www.retevis.com/resources-center/
2.Open RT29 software.
3.Check the port in your PC device manage.
4.Choose the communication port inside software.
 5.Click “read from radio” from “Programe” Column.
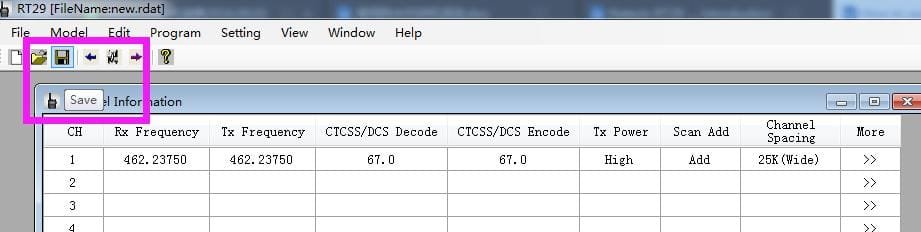
6.Programme the frequency and CTCSS/DCS you want to communicate with.
Such as:
Receive frequency:462.2375Mhz.
Transmit frequency:462.2375Mhz
Receive CTCSS/DCS:67
Transmit CTCSS/DCS:67

Take note for analog communication, if no need connect to repeater, mostly, we just set all communication channels with SAME frequency and CTCC/DCS. No need programme frequency difference between Receive frequency and Transmit frequency.
7.Finally clicking “write to radio” in the program column
Till now, the first RT29 walkie talkie finished programming.
How to quick programme multiple RT29?
There’re two solutions:
Solution 1: Click Save, to save the first programme walkie talkie to a file.

Pull out the first programmed walkie talkie, plug in the second RT29 walkie talkie, Open “RT29.rdat” file in RT29 software, then click write to radio.
In third walkie talkie, repeating same actions, Open “RT29.rdat” file in RT29 software, then click write to radio.
Till all the radios programme ok.
Solution 2:Pull out the first programmed walkie talkie, plug in the second RT29 walkie talkie, then click” write to radio” directly, second radio programme ok.
Then same actions for the third one, forth one. Then all radios programmed ok. Any other questions about RT29 programming, please feel free to email to kam@retevis.com. Thanks.
Visits: 2509
It seems that there are no USB drivers to make the programming cable work with the RT29. I have tried multiple ways and followed the instructions. No USB driver for windows 10 can be installed. Universal drivers do not work, and even tried on a MAC. which does not even have the software to program the RT29.
It may be a hot seller, but the instructions and software need a bit of work.
hello Martin,
For RT29, please download the USB driver Ailunce HD1.
I have the connectivity issues on Windows 10. Nice radio but it is just a brick as I am unable to program it.
Tim staley_dal@yahoo.com
The software will not run on my Windows 10 PC due to a lack of the .net framework. However the framework version it requires is older than the one I have installed…
Is there a way to force it to run?
Hi, would you please install the RT29 software again? I have tested it on our computer with the system Window 10, there is no problem!
I have tried several time to enable the vox function and it does not work. I am highly disappointed that retevis is unable to solve this issue. I contacted them via whatsapp and their response was to enable PF1 to Vox, which I di, and still not working. I bought these solely to use the VOX function and am not getting any support. I may have to return thses
Hi, dear, very sorry for the delay! Did you activate the VOX function through the software? And when you set it by the software, please change the VOX level a medium value.Please have a try and have a nice day!